
Defining a Parameter Study#
A parameter study is a systematic way to vary several model parameters and have the system automatically run one or several analyses for each combination of parameters.
For instance, you may want to know how the forces affecting a joint prosthesis depend on the implanted position. Or you may be interested in finding the standing posture by which you can hold a heavy box as easily as possible between your hands. Or how the position of a handle influences the muscular effort of operating it.
Or you may be interested in knowing how the seat height and horizontal
position influence the muscle effort and metabolism of the rider. This
is precisely what we shall do in this tutorial. To make life a bit
easier for you, we have prepared a bicycle model you can download and
play around with. Please click here to download the zip fileOptimBike.zip and unpack it to some
pertinent place on your hard disk.
The bicycle model is pretty much the 2D Bike that you may know from the AnyBody Managed Model Repository.
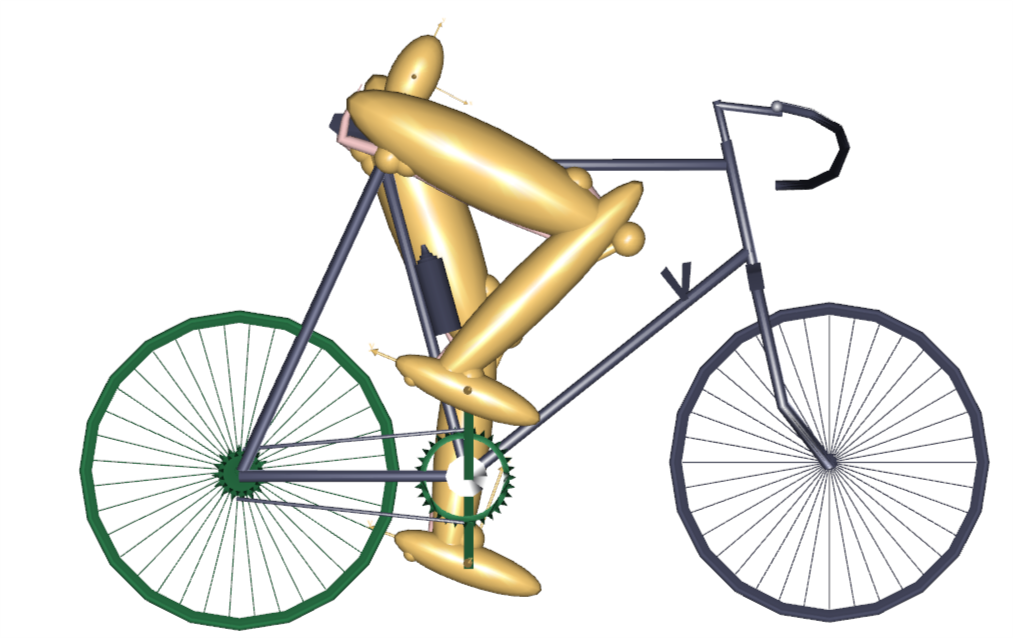
As you can see the model is very simple. It has two legs and a pelvis that is rigidly fixed to the seat. The feet are attached to the crank mechanism, and the crank is loaded by a sinusoidal torque and constant angular velocity producing a mean mechanical output of 165 W. It has a total of 18 muscles - nine on each leg. You can control the design parameters of the bicycle and the way the rider propels the pedals by means of the variables at the top of the main file. It might be a good idea to play a bit around with the variables and run some analyses. Try, for instance, to raise and lower the seat. Notice that if you raise the seat more than a few centimeters, the model has trouble reaching the pedals. This is really a kinematical problem, but it causes momentarily very high muscle activities and, if you raise the seat further, makes the kinematical analysis break down because the feet lose the contact with the pedals.
The crank torque profile of a bicycle rider changes when the set is moved horizontally because the location of the cycle’s dead center changes. To account for this, a special feature has been set up in this model to adjust the phase shift of the crank torque profile to the seat position such that the minimum crank torque occurs when the pedals point towards the hip joint regardless of where the saddle is positioned.
Some General Terminology#
Before we proceed with the definition of a parameter study it might be useful to introduce the terminology used by AnyBody for parameter and optimization studies:
A design variable is an independent parameter controlling some aspect of the model, for instance the seat height, the pedal length, the pelvic angle, the crank torque variation, the cadence, the strength of a muscle, and so on. In short, just about any property you can set in the AnyScript model. A design variable is always a single number and it must be associated with upper and lower variation limits, but it is allowed to construct the model such that many properties depend on each variable. For instance, you might want to define a variable controlling the soleus muscle strength and then let the soleus muscle in both legs depend on it. In this way you can distinguish between dependent and independent parameters, and only independent parameters can be used as design variables. The AnyScript class defining a design variable is called
AnyDesVar.A design measure is a dependent parameter that results from an analysis with given values of design variables. Typical examples would be the maximum muscle activity, the metabolism, the mechanical work, the mechanical power generated by a specific muscle, or the force in a joint. The AnyScript class for definition of design measures is the
AnyDesMeasure.
These two classes are common to parameter studies and optimization
studies, so the two types obviously share several concepts. Let us
proceed with the definition of a parameter study. Actually, both these
studies come from the same family of classes having the AnyDesStudy as
common parent; we commonly refer to these studies as design studies.
Within this kinship, they also share the definition of the “analysis” to
be performed when evaluating the design measures for a certain set of
design variables. The “analysis” is in fact an AnyScript operation
(AnyOperation), called Analysis, which is a member of all design
studies. To state an optimization or a parameter study properly, the
design variables, the design measures, and the analysis must all be
defined.
Definition of a Parameter Study#
A parameter study is as the name indicates a study. Therefore its
natural position in the model is below the existing AnyBodyStudy. We can
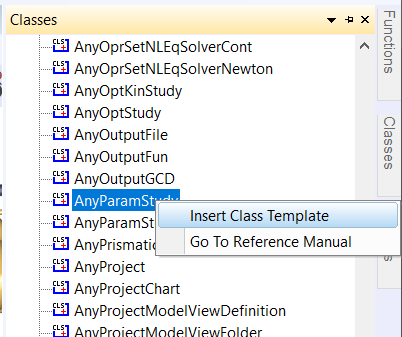
insert a new parameter study by means of the object inserter mechanism
from the class tree. Place the cursor below the definition of the
AnyBodyStudy Study, click the Classes tab in the tree view, locate the
AnyParamStudy, right-click, and insert a template of the class. You
should get the following result:
AnyBodyStudy Study = {
  AnyFolder &Model = .Model;


  Gravity = {0.0, -9.81, 0.0};
  tEnd = Main.BikeParameters.T;
};

AnyParamStudy <ObjectName> =
{
  //LogFile = ;
  /*Analysis =
  {
  Settings =
  {
  Echo = On;
  ModelSceneUpdate = On;
  };
  //AnyOperation &<Insert name0> = <Insert object reference (or full object definition)>; You can make any number of these objects!
  };*/
  nStep = ;
  AnyDesVar &<Insert name0> = <Insert object reference (or full object definition)>;
  //AnyDesVar &<Insert name1> = <Insert object reference (or full object definition)>; You can make any number of these objects!
  AnyDesMeasure &<Insert name0> = <Insert object reference (or full object definition)>;
  //AnyDesMeasure &<Insert name1> = <Insert object reference (or full object definition)>; You can make any number of these objects!
};
As you can see, this requires a bit of additional specifications and general tidying up:
AnyParamStudy ParamStudy =
{
  Analysis =
  {
  //AnyOperation &<Insert name0> = <Insert object reference (or full object definition)>; You can make any number of these objects!
  };
  nStep = ;
  AnyDesVar &<Insert name0> = <Insert object reference (or full object definition)>;
  AnyDesVar &<Insert name1> = <Insert object reference (or full object definition)>; You can make any number of these objects!
  AnyDesMeasure &<Insert name0> = <Insert object reference (or full object definition)>;
  //AnyDesMeasure &<Insert name1> = <Insert object reference (or full object definition)>; You can make any number of these objects!
};
Here’s a brief explanation of the different components of a parameter study:
Parameter |
Function |
|---|---|
|
This is a specification of the operation(s) to perform to provide the data we are studying in the parameter study. This will typically be an InverseDynamicAnalysis operation, but it could also be simply an evaluation of some mathematical expression, or it could be a combination of multiple operations, for instance various calibrations followed by an inverse dynamic analysis. |
|
This is a specification of how many steps to evaluate in the parameter study for each parameter. |
|
The study must declare at least one of these. It is the parameter(s) that are varied in the study and for combinations of which the model is analyzed. You can define as many as you like, but please beware that the number of analyses in the parameter study is the product of steps for each AnyDesVar, so the time consumption grows exponentially with the number of AnyDesVars. |
|
Each of these objects specifies a property that is the result of the analysis and which must be collected for further inspection as the study proceeds. You can define as many of these as you like. |
Let us insert the necessary specifications to perform a parameter study on the saddle position of the bicycle:
AnyParamStudy ParamStudy =
{
  Analysis = {
   AnyOperation &Operation = ..Study.InverseDynamics;
  };
As you can see, this is a pointer to the inverse dynamic analysis of the existing AnyBodyStudy in the bicycle model. This specification simply means that to evaluate the parameters we want to investigate in this parameter study, we must execute the analysis of the bicycle. This may seem obvious in a simple model like this one, but many AnyScript models contain multiple studies and each study contains multiple operations.
The next specification deals with the parameters to vary:
AnyParamStudy ParamStudy =
{
  Analysis = {
   AnyOperation &Operation = ..Study.InverseDynamics;
  };
  nStep = ;
  AnyDesVar SaddleHeight = {
    Val = Main.BikeParameters.SaddleHeight;
    Min = 0.61;
    Max = 0.69;
  };
  AnyDesVar SaddlePos = {
    Val = Main.BikeParameters.SaddlePos;
    Min = -0.22;
    Max = -0.05;
  };
  AnyDesMeasure &<Insert name0> = <Insert object reference (or full object definition)>;
  //AnyDesMeasure &<Insert name1> = <Insert object reference (or full object definition)>; You can make any number of these objects!
};
Please notice here that we have removed the ‘&’s that were inserted in
the template in front of the variable names. Instead of pointing at
AnyDesVars defined elsewhere we include the entire definition right here
in the study, and this is actually the usual way to do it.
Each AnyDesVar gets three properties set. The first one is called Val and
is simply set equal to an existing parameter in the model. The best way
to understand this statement is to think of Val as a reference variable
that is equalized in the first case with the SaddleHeight, which is a
parameter defined at the top of the main file. At any time in the
parameter study, Val will be equal to the saddle height as one should
expect from the assignment. But in this special case, the assignment
also goes the other way: It lets the parameter study control the value
of what is on the right hand side of the equality sign, in this case the
SaddleHeight parameter. We have similarly defined a second parameter,
SaddlePos, which allows the parameter study to vary the
horizontal saddle position. This two-way linkage between Val and another
variable in the model implies certain restrictions on what assignments
AnyScript allows for this particular case. The referred variable must be
a scalar quantity, i.e. either a scalar or an element of a larger
structure (e.g. vector or matrix). Secondly, it must be an independent
scalar quantity, i.e., it cannot depend (by expressions) on other
variables; otherwise there would exist an ambiguity.
The next step is to define the properties we wish to study, i.e. the dependent parameters or “design measures” of the model. As you know, after running an operation from a study the results are available in the Output branch of the tree view of the operation and they can be plotted, dumped and copied to the clipboard and so on. Now we are defining a study that will execute operations from other studies and assemble the results for later investigation. We might even want to make mathematical operations on these results, combine results from different operations, and so on. To do this we must refer to the result we wish to store for further processing. There is just one semantic problem: The results do not exist until we have performed the analysis, but we must refer to them already when we author (and load) the model.
To solve this problem we must go back to the AnyBodyStudy Study, from
where we want to lift the results, and declare an object that will allow
us to refer to computational results before they are actually made. The
object is of class AnyOutputFun, and we shall add it to the existing
AnyBodyStudy:
AnyBodyStudy Study = {
  AnyFolder &Model = .Model;

  Gravity = {0.0, -9.81, 0.0};
  tEnd = Main.BikeParameters.T;
  AnyOutputFun MaxAct = {
     Val = .MaxMuscleActivity;
  };
};
This allows us to refer to Study.Output.MaxMuscleActivity before it
actually gets created.
AnyOutputFun is actually a class of mathematical function that returns
the output (when existing) associated with the Val member. So here we
have created a function called MaxAct that takes no arguments and
returns the output data for .MaxMuscleActivity. Notice that AnyOutputFun
must be declared inside a study in order to resolve the association with
the output data structure of the particular study.
We can now use the output function, MaxAct(), in our design measure simply
by calling the function in the assignment of the Val member of the
AnyDesMeasure:
AnyDesVar SaddlePos = {
  Val = Main.BikeParameters.SaddlePos;
    Min = -0.22;
    Max = -0.05;
};
AnyDesMeasure MaxAct = {
 Val = max(..Study.MaxAct());
};
Notice the definition. The MaxAct function for each
InverseDynamics operation returns a vector of maximum muscle
activities in the model. The vector has as many components as the study
has time steps, i.e. 50 in the present case. In the definition of the
AnyDesMeasure we want to save only the largest value of each of the
vector, so we wrap the call of the MaxAct function in another max()
function. AnyScript gives you a number of such data processing functions
and we shall study others further down. Please refer to the reference
manual for further details.
One thing is missing before we can try the whole thing out: We must
specify how many steps we want the parameter study to perform for each
parameter. As in AnyBodyStudies this is done by the nStep variable, but
where nStep in an AnyBodyStudy is an integer variable, it is a vector
with one component for each AnyDesVar in an AnyParamStudy. We shall be
modest at first and choose only five steps in each direction. And so,
the final AnyParamStudy looks like this:
AnyParamStudy ParamStudy = {
  Analysis = {
    AnyOperation &Operation = ..Study.InverseDynamics;
  };
  nStep = {5,5};
  AnyDesVar SaddleHeight = {
    Val = Main.BikeParameters.SaddleHeight;
      Min = 0.61;
      Max = 0.69;
  };
  AnyDesVar SaddlePos = {
    Val = Main.BikeParameters.SaddlePos;
      Min = -0.22;
      Max = -0.05;
  };
  AnyDesMeasure MaxAct = {
   Val = max(..Study.MaxAct());
  };
};
It is finally time try it out. If you have typed everything correctly,
then you should be able to load the model. Then find the Main.ParamStudy.ParameterStudy opertion in
the operation dropdown:
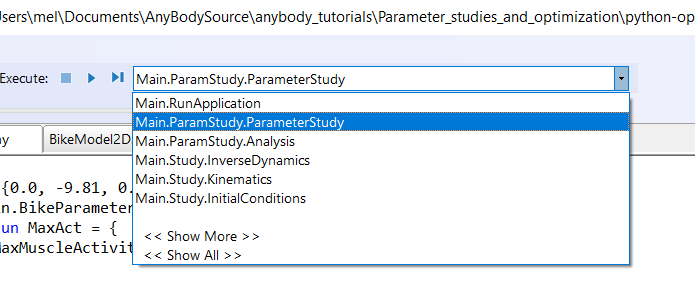
Make sure you have a Model View window open. With the ParameterStudy select in the operation drop-down click the “Run” botton. You should see the model starting to cycle, and if you watch the vicinity of the saddle carefully, you will see that the hip joint is changing its position on a 5 x 5 grid. With a reasonably fast computer it should take a minute or less to do the 25 analyses after which the computations stop.
Note
If you turn off the model view, the computation should speed up.
Congratulations! You have completed your first parameter study. Let us investigate the result.
The obvious way to visualize the results of a study with two parameters is as a 3-D surface. The chart view in AnyBody can also do that.
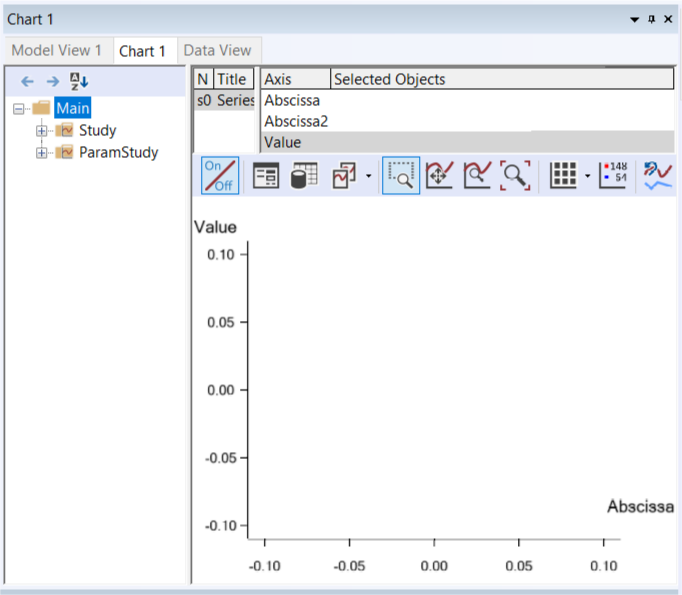
The toolbar of this window indicates a kinship with the Model View
window. Indeed, if you select the rotation button in the toolbar and
drag the mouse with the left button down inside the coordinate system
you will notice that the system rotates just like an ordinary Model
View. Now, expand the Model node in the tree until you can click the
ParamStudy->Output->MaxAct->Val property. The coordinate system
automatically attains a second abscissa axis and you can see a nice
surface like this:

The surface shows the maximum muscle activity over the cycle for each of the 25 combinations of parameters and provides a very nice overview of the behavior of the model. The surface reveals that the highest and most backward position is the best. Why not try higher and more backward, then? It is very simply to do:
AnyDesVar SaddleHeight = {
  Val = Main.BikeParameters.SaddleHeight;
    Min = 0.61;
    Max = 0.69 + 0.02;
};
AnyDesVar SaddlePos = {
  Val = Main.BikeParameters.SaddlePos;
    Min = -0.22 -0.03;
    Max = -0.05;
};
When you re-run the parameter study, things will go well in the beginning, but towards the end of the 25 combinations you may notice muscles beginning to bulge more and momentarily attain the color of magenta. This is the system’s way of demonstrating that the muscles have been loaded above 100% of their strength. The reason why this happens is that, as the seat rises, the model gets into positions where it is difficult for the feet to reach the pedals. Just before the feet cannot reach the pedals the knee movements are accelerated causing large inertia forces in the system. All this happens a bit more drastically in an ideal rigid body model than it would in real life where joints have a bit of slack, segments are slightly elastic, and the prescribed kinematics may be compromised. You can see very clearly what happens if you go back to the AnyChart View and study the new surface:
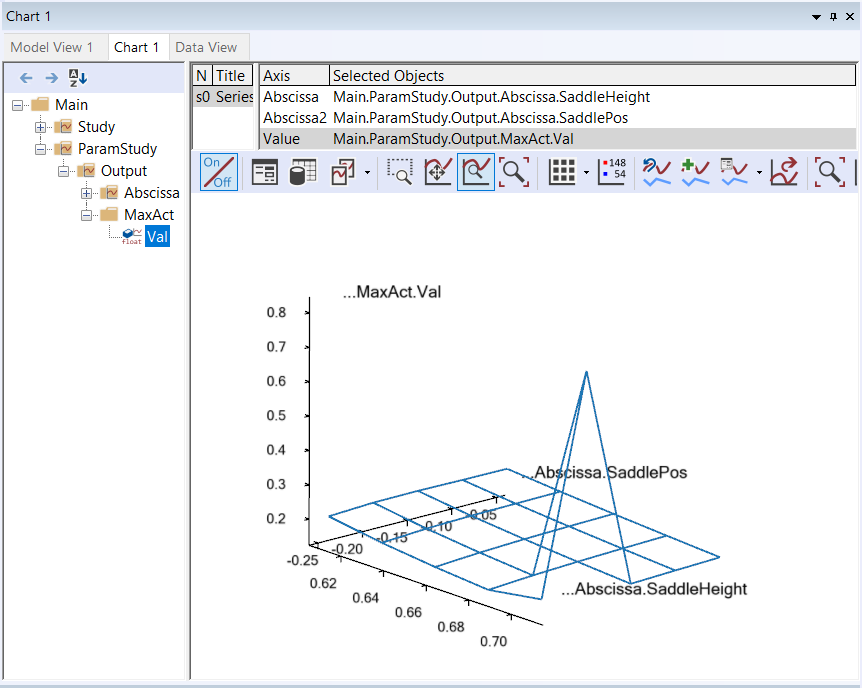
The surface is now completely dominated by the one combination, which is
difficult for the model to do. You can still see the surface shape if
you change the scale of the value axis. This and all other settings are
available if you click
the  button in the toolbar. Doing so will produce a window with a tree view
in which you can select
button in the toolbar. Doing so will produce a window with a tree view
in which you can select ValueAxis->``Max``. Try setting Max to 0.25 and you
should obtain the following:
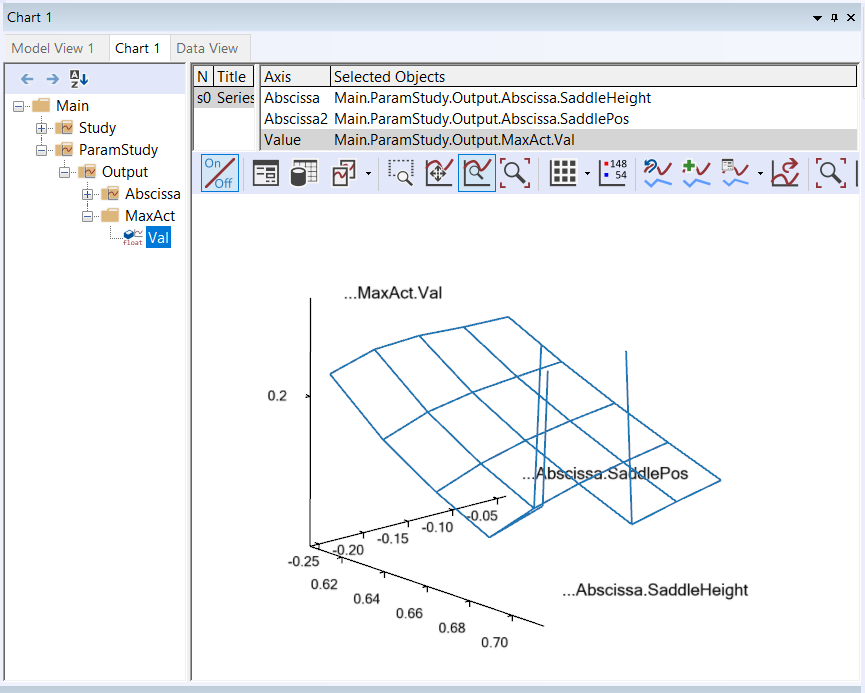
What this study reveals is that in terms of muscle activity to drive the bicycle a high seat is advantageous, but there seems to be a very sharp limit where the leg gets close to not being able to reach the pedals, and this should not be exceeded. One additional remark in this context is that this bicycle model has a predefined ankle angle variation whereas a real human can compensate for a higher seat by letting the ankle operate in a more plantar-flexed position.
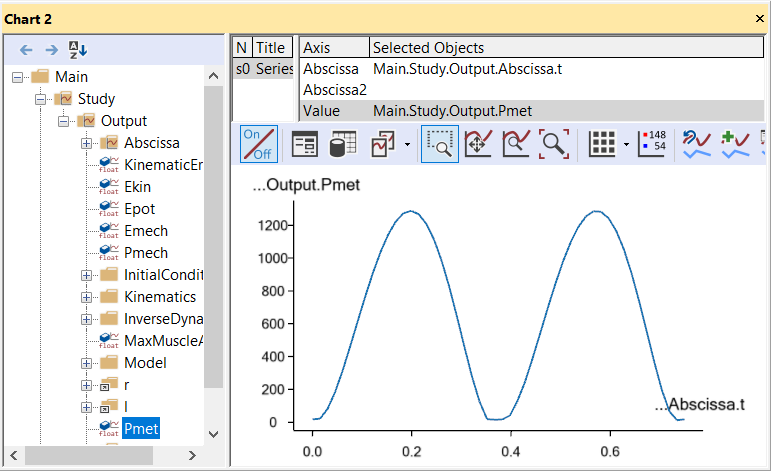
Before we finish this section, let us take a look at a particularly important feature of AnyScript mathematics: The ability to compute integral properties. AnyBody has a simple way of approximating the metabolism of muscles based on the simulation of each muscle’s mechanical work. Metabolism is technically a power measured in Watt, and the sum of the individual muscle metabolisms will give us an estimate of the total metabolism involved in the bicycling process. It is fairly simple to add up the muscle metabolisms in the AnyBody study:
/// The study: Operations to be performed on the model
AnyBodyStudy Study = {
  AnyFolder &Model = .Model;
  nStep = 50;

  Gravity = {0.0, -9.81, 0.0};
  tEnd = Main.BikeParameters.T;

  // Useful variables for the optimization
  AnyFolder &r = Main.Model.Leg2D.Right.Mus;
  AnyFolder &l = Main.Model.Leg2D.Left.Mus;
  AnyVar Pmet_total = r.Ham.Pmet+r.BiFemSh.Pmet+r.GlutMax.Pmet+r.RectFem.Pmet+r.Vasti.Pmet+r.Gas.Pmet+r.Sol.Pmet+r.TibAnt.Pmet+l.Ham.Pmet+l.BiFemSh.Pmet+l.GlutMax.Pmet+l.RectFem.Pmet+l.Vasti.Pmet+l.Gas.Pmet+l.Sol.Pmet+l.TibAnt.Pmet;


  AnyOutputFun MaxAct = {
    Val = .MaxMuscleActivity;
  };
};
Notice that we have defined the r and l variables for convenience to
limit the size of the expressions. If you run the InverseDynamics Analysis
(go on and try!) you will find the new variable mentioned in the list of
output, and you can view it in the chart view.
The area under this curve is the total metabolism combusted over a crank
revolution. To compute this we must introduce two more elements. The
first one is an AnyOutputFun as we have seen it before. The purpose of
this function is to make it semantically possible to refer to the output
of the Pmet_total variable before is has actually been computed:
  // Useful variables for the optimization
  AnyFolder &r = Main.Model.Leg2D.Right.Mus;
  AnyFolder &l = Main.Model.Leg2D.Left.Mus;
  AnyVar Pmet_total = r.Ham.Pmet+r.BiFemSh.Pmet+r.GlutMax.Pmet+r.RectFem.Pmet+r.Vasti.Pmet+r.Gas.Pmet+r.Sol.Pmet+r.TibAnt.Pmet+l.Ham.Pmet+l.BiFemSh.Pmet+l.GlutMax.Pmet+l.RectFem.Pmet+l.Vasti.Pmet+l.Gas.Pmet+l.Sol.Pmet+l.TibAnt.Pmet;

  AnyOutputFun MaxAct = {
    Val = .MaxMuscleActivity;
  };
  AnyOutputFun Metabolism = {
    Val = .Pmet_total;
  };
};
The second missing element is the actual integration of the function. This we perform in the parameter study where we define the AnyDesMeasure:
AnyParamStudy ParamStudy = {
  Analysis = {
    AnyOperation &Operation = ..Study.InverseDynamics;
  };
  nStep = {10,10};
  AnyDesVar SaddleHeight = {
    Val = Main.BikeParameters.SaddleHeight;
      Min = 0.61;
      Max = 0.69 /*+ 0.02*/;
  };
  AnyDesVar SaddlePos = {
    Val = Main.BikeParameters.SaddlePos;
      Min = -0.22 /*-0.03*/;
      Max = -0.05;
  };
  AnyDesMeasure MaxAct = {
    Val = max(..Study.MaxAct());
  };
  AnyDesMeasure Metab = {
    Val = secint(..Study.Metabolism(),..Study.tArray);
  };
};
The secint function performs a numerical integration of the first argument against the second argument. Each argument must be an array and the number of components in the two arguments must be the same.
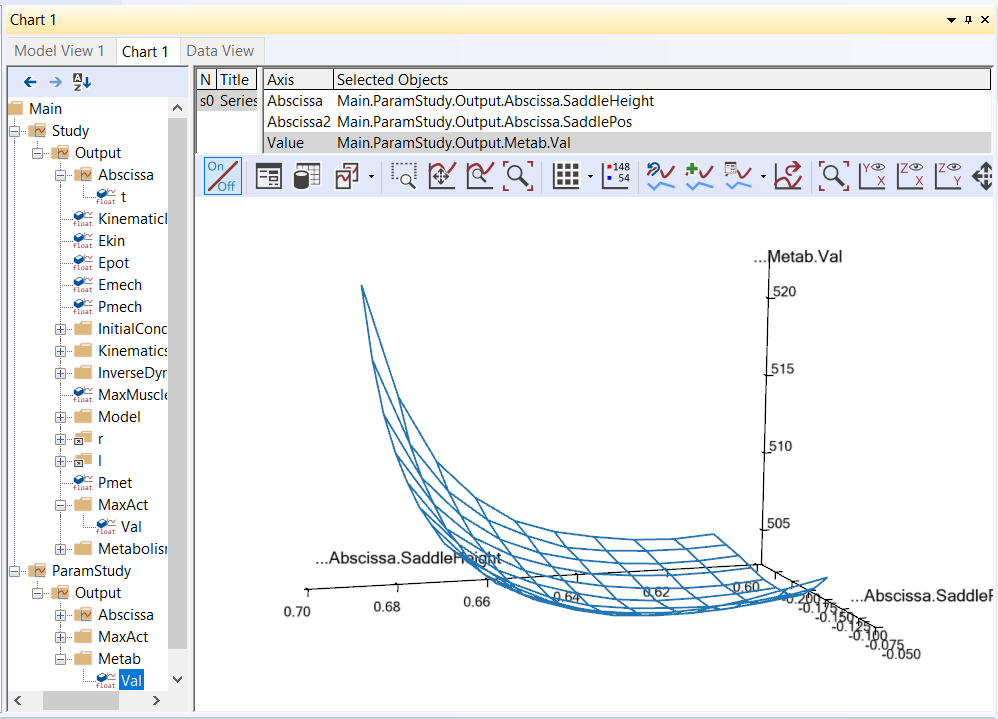
Notice the other two changes: We have changed the variable limits back
to what they were before and we have decided to be a little more
adventurous and have specified 10 variable steps in each direction. It
is time to run the parameter study again. The new Metab variable is now
available in the list under the ParamStudy in the Chart window and
can be plotted:
We shall return to the capabilities of the Chart view in more detail in the next lesson, which deals with the definition of optimization studies.