
Lesson 5: Forces#
Old tutorial:
This tutorial has not yet been updated to ver. 7 of the AnyBody Modeling System. Some concepts may have changed.
There are several types of forces in an AnyBody model; forces in joints,
forces in muscles, and gravity forces working on the segments. This
section, however, deals only with the application of external forces. We
need something to work on, and here's a copy of the simple arm model you
can use. Please right-click here and save to your local disk
(Demo.Forces.1.any). When you have saved the file, please open it up in
AnyBody.
At the end of the ArmModel folder you will find that we have added an empty folder named Loads:
    AnyFolder Loads = {

    };  // Loads folder
}; // ArmModel
AnyForce3D: External forces#
External forces on a mechanical system are usualy perceived as vectors with some point of attack, and this is indeed one of the ways you can define forces in AnyScript. Let us begin by defining a force acting on the PalmNode of the ForeArm segment. The way to go is to first make sure the model is loaded successfully (by having pressed F7). Please do not reload the model again before we are finished making the necessary changes.
Place the cursor on the empty line inside the new Loads folder. Then select the Classes tab in the tree view on the left hand side of the editor window, expand the Class List and scroll down until you come to AnyForce3D. Right-click the class and pick Insert Class Template. This will give you:
AnyFolder Loads = {
    AnyForce3D <ObjectName> = {
        //F = {0, 0, 0};
        //Flocal = {0, 0, 0};
        AnyRefFrame &<Insert name0> = <Insert object reference (or full object definition)>;
    };
};  // Loads folder
Let us initially give the force a descriptive name:
AnyFolder Loads = {
    AnyForce3D PalmLoad = {
        //F = {0, 0, 0};
        //Flocal = {0, 0, 0};
        AnyRefFrame &<Insert name0> = <Insert object reference (or full object definition)>;
    };
};  // Loads folder
One of the missing blanks is an AnyRefFrame. This is the point of attack of the force. In our case we want it to work on the PalmNode. We first prepare for inserting the name of the node:
AnyFolder Loads = {
    AnyForce3D PalmLoad = {
        //F = {0, 0, 0};
        //Flocal = {0, 0, 0};
        AnyRefFrame &PointOfAttack = ;
    };
};  // Loads folder
Now, please place the cursor just before the semicolon at the end of the PointOfAttack line, select the Model tab in the tree view on the left hand side of the editor window, unfold the ArmModel.Segs.ForeArm branch, locate the PalmNode, right-click it and select Insert Object Name. You should get the following result:
AnyFolder Loads = {
    AnyForce3D PalmLoad = {
        //F = {0, 0, 0};
        //Flocal = {0, 0, 0};
        AnyRefFrame &PointOfAttack = Main.ArmModel.Segs.ForeArm.PalmNode;
    };
};  // Loads folder
Please notice now that two lines in the middle of the object are commented out. We need to enable exactly one of them and we shall begin with the first one, specifying also a non-zero force vector:
AnyFolder Loads = {
    AnyForce3D PalmLoad = {
        F = {0, -50, 0};
        //Flocal = {0, 0, 0};
        AnyRefFrame &PointOfAttack = Main.ArmModel.Segs.ForeArm.PalmNode;
    };
};  // Loads folder
When this specification is used, the force vector gets defined in global coordinates. The global y direction in this model is upwards, so the vector F = {0, -50, 0} specifies a load directed downwards. Now is the time to reload the model and open a Model View window if you have not already done so. After successful load, please select the InverseDynamicAnalysis and click the Run button. You will see the bulging of the muscles in response to the downward load on the hand.
It may be nice to be able to actually see the force we have applied. This can be done with an AnyDrawVector object that we can conveniently place inside the PalmLoad object like this:
AnyFolder Loads = {
    AnyForce3D PalmLoad = {
        F = {0, -50, 0};
        //Flocal = {0, -50, 0};
        AnyRefFrame &PointOfAttack = Main.ArmModel.Segs.ForeArm.PalmNode;
        AnyDrawVector drF = {
            Vec = .RefFrameOutput.F[0]/200;   // Scale the length down
            Line = {
                Style = Line3DStyleFull;
                Thickness = 0.01;
                RGB = {1, 0, 0};
                End = {
                    Style = Line3DCapStyleArrow;  // This specifies the end to be an arrowhead
                    RGB = {1, 0, 0};
                    Thickness = 0.02;  // The head begins with twice the thickness of the shaft
                    Length = 0.05;
                };
            };
        // attach the arrow to the hand
        AnyRefFrame &Palm = Main.ArmModel.Segs.ForeArm.PalmNode;
        };
    };
};
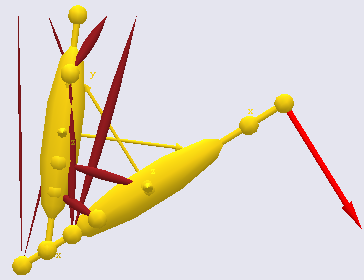
As you can see, the AnyDrawVec is a class with a lot of different settings available, and there are actually much more than listed here. You get to see all of them if you use the class tree to insert the object. For now, let’s just reload the object and run the model. You should see a red arrow pointing down from the hand indicating the direction of the force.

One of the advantages of defining models in a computer language is that numbers can be replaced by mathematical expressions. So instead of the constant force vector we can write a function of time, for instance:
AnyFolder Loads = {
    AnyForce3D PalmLoad = {
        F = {0, -50, 0}*sin(2*pi*t);
        //Flocal = {0, 0, 0};
        AnyRefFrame &PointOfAttack = Main.ArmModel.Segs.ForeArm.PalmNode;
    };
};  // Loads folder
If you reload and run the InverseDynamicAnalysis again you will see the force arrow chage direction and you will also see that the muscle activation changes from the frontal to the posterior side of the arm in response to the changing load.
Let’s impose some movement. It is easily done by a small change in the elbow driver:
AnyKinEqSimpleDriver ElbowMotion = {
    AnyRevoluteJoint &Jnt = ..Jnts.Elbow;
    DriverPos = {1.5};
    DriverVel = {60*pi/180};
    Reaction.Type = {Off};
}; // Elbow driver
After this change try reloading the model and running the inverse dynamic analysis again. You should see the model flex its elbow.
For the next issue it is better to change the force back to a constant value:
AnyFolder Loads = {
    AnyForce3D PalmLoad = {
        F = {0, -50, 0};
        //Flocal = {0, 0, 0};
        AnyRefFrame &PointOfAttack = Main.ArmModel.Segs.ForeArm.PalmNode;
    };
};  // Loads folder
Please load and run again and notice how the external force is vertical all the time regardless of the movement of the forearm. This is because we used the property F to specify the force in the PalmLoad object. How would we go about defining a force that follows the direction of the hand instead? Well, this is what the Flocal property is for. Let’s make a small change in the force specification:
AnyFolder Loads = {
    AnyForce3D PalmLoad = {
        //F = {0, -50, 0};
        Flocal = {0, -50, 0};
        AnyRefFrame &PointOfAttack = Main.ArmModel.Segs.ForeArm.PalmNode;
    };
};  // Loads folder
The only change here is that we are using the Flocal property rather than F to specify the force. Loading and running the model again will show the force now changing direction with the movement of the arm but maintaining its direction perpendicular to the forearm, i.e. in the negative y axis of the PalmNode reference system to which it is attached.
AnyForce: Internal forces (sort of)#
Many applications in biomechanics deal with some notion of joint moment. Let us imagine we wanted to apply a given joint moment to the elbow and check how the muscles would cope with carrying that.
Our first idea might be that the Flocal property of AnyForce3D would be ideal for this. If we just work out the distance between the elbow and the PalmNode then we can easily compute how much Flocal we have to apply to the forearm to obtain the desired joint moment in the elbow.
But first ideas don’t always fly and in this situation the use of AnyForce3D with Flocal would have an undesirable side effect: The applied force would also generate a moment about the shoulder joint, and since there are bi-articular muscles crossing the shoulder as well as the elbow this is likely to disturb the muscle recruitment pattern significantly. So, what to do?
Well, what we really want is something that just affects the elbow and is balanced perfectly from the point-of-view of the rest of the model. We could come up with an applied force that goes from the upper arm to the forearm, and should this force then be perpendicular to the forearm or to the upper arm? Obviously it cannot be both.
It looks like it might be nice with a more general force application option, and this is what the AnyForce class is. It allows us to apply a generalized force to any kinematic measure we can possibly define. The AnyForce takes the form of the kinematic measure, so a linear measure results in a force and a rotational measure results in a moment. Moreover, because kinematic measures are such a general concept there are very few limits to the kinds of forces that they can be used to specify. So, the elbow moment might simply be applied as an AnyForce applied to some rotational measure of the elbow angle, and as the measure we can conveniently use the elbow joint.
We start by disabling the external forces from before:
AnyFolder Loads = {
    AnyForce3D PalmLoad = {
        //F = {0, -50, 0};
        Flocal = {0, 0, 0};
Instead, we define an AnyForce. Place the cursor inside the Loads folder right after the ending brace of the PalmLoad object. Then click the Classes tab in the tree on the left hand side of the editor window, unfold the Class list, scroll down to the AnyForce class, right-click it and insert a template. You should get this:
AnyFolder Loads = {
    AnyForce3D PalmLoad = {
        //F = {0, -50, 0};
        Flocal = {0, 0, 0};
        AnyRefFrame &PointOfAttack = Main.ArmModel.Segs.ForeArm.PalmNode;
        AnyDrawVector drF = {
            Vec = .RefFrameOutput.F[0]/200;
            Line = {
                Style = Line3DStyleFull;
                Thickness = 0.01;
                RGB = {1, 0, 0};
                End = {
                    Style = Line3DCapStyleArrow;
                    RGB = {1, 0, 0};
                    Thickness = 0.02;
                    Length = 0.05;
                };
            };
            AnyRefFrame &Palm = Main.ArmModel.Segs.ForeArm.PalmNode;
        };
    };

    AnyForce <ObjectName> =
    {
        F = ;
        //AnyKinMeasure &<Insert name0> = <Insert object reference (or full object definition)>;
    };
};  // Loads folder
The structure of the AnyForce class is obviously very simple. This is because it draws so heavily on the kinematic measure inside it for its definition. Let’s apply a moment to the elbow:
AnyForce ElbowMoment = {
    F = {-50};
    AnyKinMeasure &Elbow = Main.ArmModel.Jnts.Elbow;
};
This applies a moment of -50 units to the elbow. This happens to be an extension moment, so when you load and run the model again, you will notice activity mainly in the flexor muscles. But how did we know that a negative value corresponds to an extension moment? It is actually rather simple. The joint has a positive angle direction and the applied AnyForce follows the sign convention of the kinematic measure it is attached to. In our case we know from the setting of the driver moving the elbow joint that a positive angular velocity corresponds to flexion, so a negative moment on the corresponding kinematic measure must be an extension moment.
If you look carefully, you will also see activity in some of the mono-articular shoulder muscles. Why does this happen? Wasn’t the AnyForce supposed to only affect the elbow? Indeed it was and does, but some of the muscles crossing the elbow also affect the shoulder, so co-contraction is necessary to stabilize the shoulder in the presence of elbow muscle activity.
What makes the AnyForce local, then? The answer is that the AnyForce refers to the elbow joint, and the elbow joint refers to the upper arm and the forearm. So these are the segments affected by the AnyForce. If the AnyForce includes a reference to a fixed reference frame then the force applied will have a component going to ground and it will at least partially work as an external force, but otherwise it is strictly internal.
AnyForces have many interesting applications. For instance they can be used to specify gravity-type force fields if you apply them to an AnyCoM measure. Another interesting use of AnyForces is for specification of predefined muscle forces. There is a kinematic meaure inside any muscle, and if an AnyForce is applied to this measure, that force will be predefined in the muscle. Please notice, that the system may decide to recruit muscle force beyond what you have applied unless the muscle has been set to zero strength.
Further studies:#
The following two examples illustrate more of the features of forces in AnyBody.
The first example is a rather basic application of time-varying forces to the simple arm model. In addition to the subjects covered in the sections above it shows forces defined directly as interpolated values a set of measured data points, for instance from a force platform.
The second example illustrates among other things how forces acting on a segment can be summed up.