
Introduction: Understanding Studies in AnyBody#
In AnyBody, studies and operations are the mechanisms used to specify tasks to be performed on the model. Think of a study as a collector that brings together a model definition, the operations that execute the model, and the results to be analyzed afterwards. Meaning, operations are the tasks performed on the model. They can be executed from the AnyBody interface, generating and storing output in the study based on the function of the specific operation.
Why Do We Need Studies?#
You might wonder why we need studies. After all, couldn’t you just load a model and have operations readily available in the AnyBody interface? The answer lies in the flexibility that studies offer.
Studies are defined as special classes, allowing you to have multiple studies in the same model. As objects in the model, you can have as many studies as you need (or as many as your computer can handle), and they don’t necessarily have to operate on the same model definition, even if they share elements.
For instance, you might want to perform different operations on the same model, or perform the same operation on nearly identical models, and then compare the results. With two studies, you can do this within a single AnyBody model.
The Hierarchy of Study Classes#
Studies are derived from a base class called AnyStudy, and the operations found
within studies are also defined as classes, all derived from the base class
AnyOperation.
Here’s a look at the hierarchy of study classes in AnyBody:
AnyStudy(Base class for all studies)AnyTimeStudy(Base class for time variation studies)AnyKinStudyAnyMechStudyAnyBodyStudyAnyBodyCalibrationStudy
AnyDesStudy(design variable studies, see a separate tutorial)
In this tutorial, we’ll focus on time-varying studies, particularly mechanical studies that deal with the analysis of mechanical systems.
Mechanical Studies#
Mechanical studies, derived from AnyMechStudyBase, are quite similar, but they
contain different sets of available operations. The base class is empty, with
AnyKinStudy extending it with functionality for kinematic analysis. AnyMechStudy
further extends this with kinetic (dynamic) analysis of basic mechanical
systems.
AnyBodyStudy is the most frequently used study by AnyBody users, as it extends
the kinematic analysis functions with operations for kinetic (dynamic) analysis
of musculoskeletal systems, which is the core functionality of the AnyBody
Modeling System. AnyBodyCalibrationStudy provides additional functionality in
this regard.
In this tutorial, we’ll use AnyBodyStudy as our starting point due to its
central role in the system and its popularity among users. It also contains
almost all of the operations found in other mechanical studies. However, we
won’t delve into the details of musculoskeletal simulation in this tutorial, as
that topic is covered in a separate tutorial, “Inverse Dynamics of Muscle
Systems”.
The AnyBodyStudy and Studies in general#
A study in AnyBody is essentially a folder that contains specifications. These specifications are placed between a pair of braces and become part of the study. A study has predefined properties that you can set, must set, or cannot modify.
When you create a new model using File -> New from Template..., the system
automatically inserts an AnyBodyStudy in the main file. It looks like this:
// The study: Operations to be performed on the model
AnyBodyStudy MyStudy = {
  AnyFolder &Model = .MyModel;
  Gravity = {0.0, -9.81, 0.0};
};
This study contains all the necessary elements. The first word after AnyBodyStudy defines the name of the study, which in this case is MyStudy. The last line Gravity = {0.0, -9.81, 0.0}; assigns a value to the Gravity variable,
which specifies the gravitational acceleration vector affecting the model.
An AnyBodyStudy has many more predefined properties that you can modify. You can
view these properties using the Model Tree View, which is attached to the left
of the Main Frame. Double-clicking any object in the Model Tree will show you
properties of the objects in the Object Description dialog box.
Most of the properties deal with solution methods, tolerances, and other advanced user features. However, some properties are essential for all users:
tStart: The time at which the study begins. Usually, this is zero.tEnd: The time at which the study ends. This often needs to be set by the user.nStep: Specifies how many steps the system should use to go from tStart to tEnd.
Understanding the Structure of a Study#
Let’s take a closer look at the first line of the study:
AnyFolder &Model = .MyModel;
Here, “AnyFolder” is a type definition. Unlike the predefined properties we discussed earlier, this line introduces a new property to the study. This is a key aspect of studies: you can add almost anything to a study, and the study doesn’t need to know its type in advance.
Note
You can choose to point to some subfolders of MyModel instead of the entire
model. This means the study would work on just a subset of the model.
For example, you might want to compare two nearly identical models. In this case,
you can put all common parts in one folder and the distinctive parts in separate
folders. Then, you can create two studies that
reference the common part and their respective distinctive parts.
This line defines a variable called “Model” and assigns it to .MyModel. If you
look at the start of the AnyScript file, you’ll see that MyModel is the folder
containing the entire model the system has generated for you. The prefix .
before MyModel indicates that it’s one level up from where it’s referenced.
By assigning MyModel to the Model variable, the entire model comes under the
influence of the study. The & before “Model” means that Model doesn’t get
replicated inside the study. Instead, it’s a pointer to MyModel. If you’re
familiar with C, C++, or Java programming, you’ll recognize this as the concept
of pointers. If not, think of a pointer as a reference to something defined
elsewhere. When you access it, you’re actually interacting with what it points
to.
Elements of a Study#
When you create an AnyBodyStudy, it automatically includes three standard
operations in the study tree. These operations represent different actions you
can perform on the model elements that the study points to:
InitialConditions: This operation reads the values of any drivers you’ve included in the study. It then sets the model to match these drivers at the start time (tStart). The model is first initialized into the initial positions from load time, and the kinematics is then solved in a few steps. This is especially helpful for inspecting the specified initial positions if you’re having issues with the initial configuration of the mechanism.Kinematics: This operation performs a kinematic analysis, which is a simulation of the model’s movement without calculating any forces. This means you can run a Kinematics operation as soon as you’ve uniquely defined the movement. You don’t need any muscles in the model for this operation.InverseDynamics: This operation simulates the forces involved in the given movement or posture, along with anything that can be derived from them. The InverseDynamics operation uses the Kinematics operation as a subroutine, so it requires a correctly defined movement or posture, as well as the necessary muscles or motors to drive the model.
When you execute each of these operations, they compile their output in the Output section under the study tree. This allows you to easily access and analyze the results of each operation.
Running operations#
Operations can be executed in three ways:
Through the model tree
Using the operation drop-down in the toolbar
Via the special operations tree view
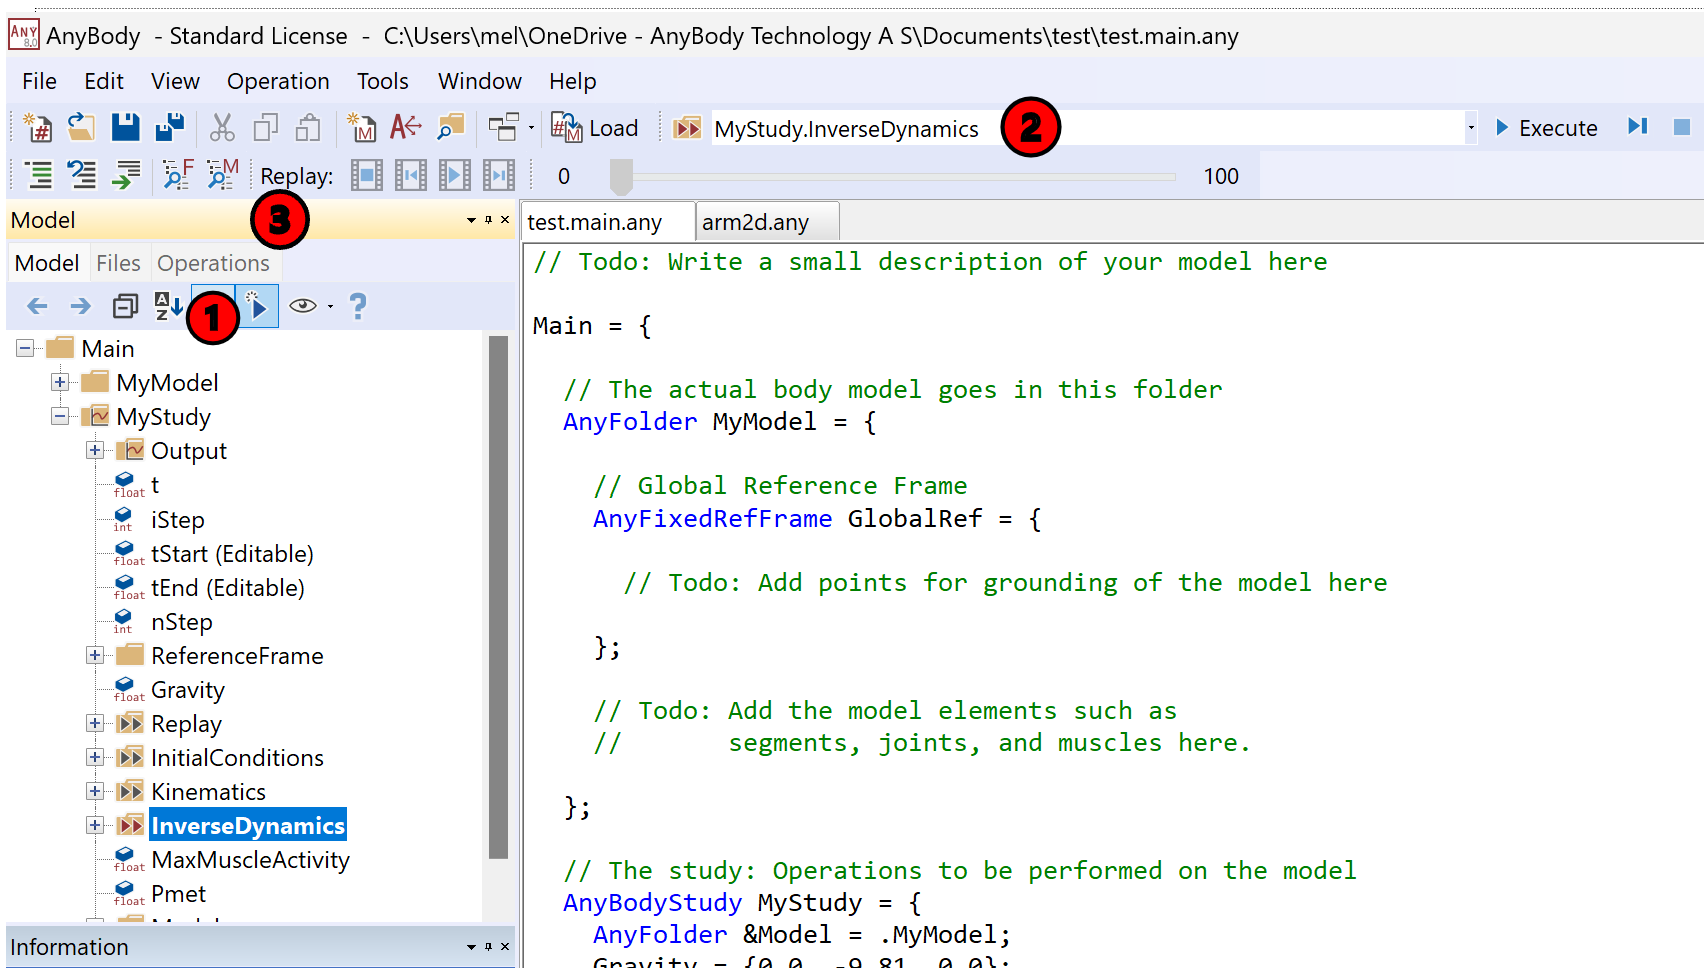
The easiest way to execute an operatin is to find it in the operations drop-down in the toolbar. If the operation is not avilable here you can always find in the model tree.
Once an operation is selected in the toolbar, you can press the buttons to start/stop/reset the operations.
The “Run” button starts the study, which will continue until it finishes or encounters an error. Once you press the run button, it changes to “Break”, and pressing it in this state stops the current analysis process.
The “Step” button executes one step at a time. The definition of a “step” varies depending on the operation. For Kinematics and InverseDynamics, a step is one time step of the movement. For InitialConditions, a step is one of the several distinct operations needed to set the model to its initial state.
The “Reset” button returns the model to its initial state after it has completed a sequence of time steps. You must press “Reset” before you can rerun the model.
In the upcoming lessons, we’ll delve deeper into the different functionalities in an AnyBodyStudy:
We are then ready to proceed to Lesson1: Mechanical System Information.