
Lesson 2: Including a Custom Scaling Function into Your Model#
This lesson explains how to use your own custom scaling function designed in Lesson 1 and combine it with the overall human body scaling laws, so anthropometric scaling and subject-specific scaling are combined.
Shortly explained, the sections in this lesson are as follows:
Prepare the base model: Opening the Standing Human Model and preparing the model for subject-specific scaling.
Include your custom scaling function: Add your custom scaling function to personalize a single segment (the femur).
Include a mirrored custom scaling function: Apply the same custom scaling to the opposite femur by mirroring the original scaling function.
See also
This lesson uses the human body scaling laws presented in the AMMR, thus it is highly recommended that you read the section on scaling in the AMMR documentation before proceeding with this lesson.
Preparing for Subject-Specific Scaling#
When creating a musculoskeletal model, we have to decide on the dimensions of the body parts. The Scaling section in the AMMR documentation describes how anthropometric regression equations and body measurements can be used to define these dimensions. However, the most precise models include subject-specific geometries of the bones or morph the underlying template model to take these shapes. To explain how we can include these, let us consider a simple scenario: We have a model of a person who matches the standard size man and we want to perform an inverse dynamics analysis. Additionally, we have the geometry from a CT-scan of one of his left femur. To increase the accuracy of our model, let us improve it using a subject-specific scaling for the femur.
First of all, let us prepare a model matching the standard size man to
be the basis for further subject-specific improvements. Therefore we use the
StandingModelScalingDisplay
from the AMMR, with the _SCALING_STANDARD_, option. This is well suited to show how
to use subject-specific geometry in a model.
Including Custom Scaling for a Single Segment#
Let us configure this example to use ScalingStandard. We need to define
BM_SCALING as _SCALING_STANDARD_ and out-comment all other parts of
the scaling configuration block. With this setting, the model is now scaled to
the generic size.
// Scaling laws using joint to joint measures
    #define BM_SCALING _SCALING_STANDARD_
//  #define BM_SCALING _SCALING_NONE_
//  #define BM_SCALING _SCALING_UNIFORM_
//  #define BM_SCALING _SCALING_LENGTHMASS_
//  #define BM_SCALING _SCALING_LENGTHMASSFAT_
We can now include individual scaling functions for each segment,
which will be done in a special file CustomScaling.any, where all the
modifications related to individual segment should be be done.
This file is already present in the example and you can include it as shown
below:
//--------------- END OF SCALING CONFIGURATION -------------------

#include "Model\CustomScaling.any"

#include "<ANYBODY_PATH_BODY>/HumanModel.any"
Tip
In case you want to personalize your own model - just copy CustomScaling.any
file into the Model folder and follow the instructions from this tutorial.
If we open this file (by a double clicking on it), we can see that a common place to make modifications has already been prepared. Further, we can find an access point to the geometrical scaling law folder, which will be used to specify individual scaling laws.
// This is a place holder for the inclusion of custom scaling laws
HumanModel.Scaling.GeometricalScaling = {

};
So let us introduce a custom scaling function for the left femur from
Lesson 1. We prepared a single file
MyScalingFunction.any holding the scaling
transforms from the previous lesson. We also need to download the
source (native to AMMR) and
target (courtesy of Prof.
Sebastian Dendorfer, OTH Regensburg, Germany) femur surface
geometries.
Next copy these three files into the Model subfolder in the
StandingModelScalingDisplay example.
Now, we need to make several small adjustments to the scaling law for smooth incorporation into the model structure.
In the AMMR, scaling functions are implemented in the anatomical reference frames. We will call this frame a scaling reference frame, since there might be several definitions of anatomical reference frames. In general, the segmental frame can be different from the scaling reference frame. The human body model internally handles relevant reference frame changes without needing users to do anything. However, this leads to small modifications needed for the subject-specific scaling function inclusion into the full-body model.
In order to perform the scaling or morphing in another reference frame – all source
entities need to be moved into that reference frame. This can be done
using a rigid body transformation to preserve sizes of all objects.
In our scaling law (MyScalingFunction.any) the source entities are
MyScalingFunction.AffineTransform.Points0,MyScalingFunction.RBFTransform.Points0,MyScalingFunction.STLTransform.Input.SourceSurf.
In the AMMR, such transformations will be segment dependent. It is only needed
for right and left shank and femur as well as for the pelvis. For all other
segments, this transform can be defined as an identity transformation or does
not have to be applied to the source entities. The following transforms can be
referenced as TSeg2ScaleFrame (Transform Segmental 2 to
Scaleling Frame). That name will be used further:
HumanModel.BodyModel.[Left/Right].Seg.[Thigh/Shank].Scale.T0HumanModel.BodyModel.Trunk.SegmentsLumbar.PelvisSeg.Scale_Trunk_Pelvis.ScaleAfterInterfaceMorphingDef.Scale.T0
In the model repository this transform, TSeg2ScaleFrame, is already defined and can be found in the
subfolder of HumanModel.Scaling.GeometricalScaling, which corresponds to
the morphed segment and has a similar name. This transform can be easily
accessed as demonstrated below and no extra actions are needed.
Let us subject the source entities of the scaling law to the rigid body
transformation, TSeg2ScaleFrame. We will need to make the following 3 changes
in the file MyScalingFunction.any. Please note how we look up out of the
MyScalingFunction folder using .. and ... prefixes to the variables.
  AnyFunTransform3DLin2 AffineTransform =
  {
    //PreTransforms = {};
    Points0 = ..TSeg2ScaleFrame(
    {{-0.00906139,    0.36453,  0.0175591},      // fovea capitis
    ...
     {-0.0320739, -0.00877602,  0.0244234}});// medial posterior condyle
    Points1 =
    {{0.289913,0.420538,0.0138931},    // fovea capitis
    ...
  AnyFunTransform3DRBF RBFTransform =
  {
    PreTransforms = {&.AffineTransform};
    PolynomDegree = 1;
    RBFDef.Type = RBF_Triharmonic;

    Points0 = ..TSeg2ScaleFrame({
      {-0.00920594,  0.36459700,  0.0174376},  // fovea capitis
      ...
      {-0.00431680,  0.35912600,  0.0036940}   // femoral COR
    });
    ...
  AnyFunTransform3DSTL STLTransform =
  {
    PreTransforms = {&.RBFTransform};
    PolynomDegree = 1;
    RBFDef.Type = RBF_Triharmonic;
    AnyFixedRefFrame Input = {
      AnySurfSTL SourceSurf = {
        FileName = "SourceFemur.stl";
        ScaleXYZ = {1, 1, 1};
        AnyFunTransform3D &pre = ....TSeg2ScaleFrame;
      };
As you will see from the following changes the modification simply links
the transformations to the folder containing our file MyScalingFunction.any.
In our case, this folder is
HumanModel.Scaling.GeometricalScaling.Left.Thigh, which corresponds to
the name of the segment, we are trying to morph, and contains our
TSeg2ScaleFrame rigid body transform.
So finally let us add this scaling function to the model. Please
insert the following lines as shown below into the file
CustomScaling.any:
// This is a place holder for the inclusion of custom scaling laws
HumanModel.Scaling.GeometricalScaling = {
  Left.Thigh = {
    #include "MyScalingFunction.any"
    ScaleFunction.Custom = &MyScalingFunction.Transform;
  };
In this modification, we simply replaced the default anthropometric scaling function of the left
thigh with the custom function from MyScalingFunction.any. To process other body
parts you will need to do a similar redefinition. You can find a list of segments by
browsing the scaling law in the Model tree as shown below. Each folder will contain
ScaleFunction.Custom object, which can be reassigned to something else:
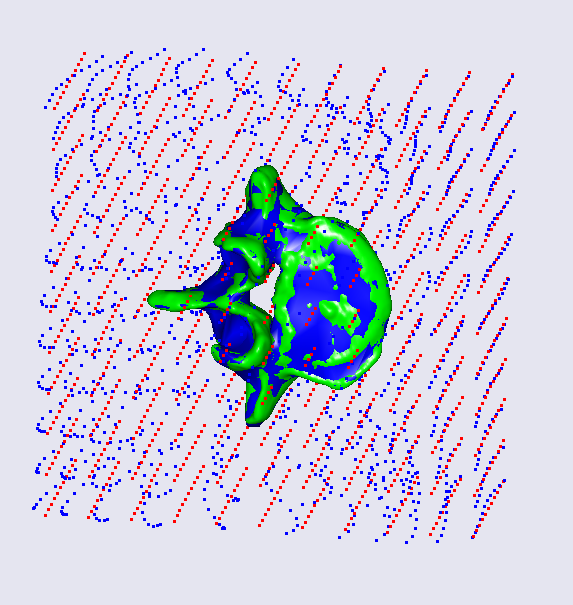
The second change we made was to assign the new custom scaling function to be used in the segment of the left thigh instead of the excluded one. If we look in the Model View, we can see that the left femur is now shorter and a little thinner than with the standard scaling. So we have now successfully introduced our custom scaling law into the model.
Warning
It is important to note that the scaling function so far only personalizes a single bone (one femur). The rest of the body still uses the standard body model with anthropometric scaling laws.
If we worked with a bone that does not have a contralateral pair (e.g. vertebrae or skull), or if you intentionally personalize only one side of the human body, we would continue with running the inverse dynamics. However, for paired segments like the femur it is recommended to also scale the other side of the model to ensure symmetry of the body.
Best practice is to have patient-specific geometry for both sides and reuse the scaling code with the second dataset. But, in this tutorial, only one side is available, so we assume that the body is symmetric, which is only true up to a certain extent. So let us include a similar scaling for the corresponding mirrored pair. In the next section we will describe how to introduce mirroring to our scaling functions.
Introducing a Mirrored Custom Scaling Function#
We start by making a copy of the file MyScalingFunction.any that will be used to
construct the mirrored transform and call it MyScalingFunction_Mirrored.any.
What we have to do is to define a symmetry plane and reflect relevant
entities accordingly. In this example such plane corresponds to the
global XY plane. To perform the reflection, we need to multiply all
relevant landmark points contained in the MyScalingFunction_Mirrored.any
file by a mirroring matrix:
AnyFolder MyScalingFunction_Mirrored = {
  AnyMatrix AMirroring = { // XY plane symmetry
    {1,0,0},
    {0,1,0},
    {0,0,-1}
  };
  ...
  AnyFunTransform3DLin2 AffineTransform =
  {
    //PreTransforms = {};
    Points0 = ..TSeg2ScaleFrame({...} * .AMirroring);
    Points1 = {...} * .AMirroring;
    Mode = VTK_LANDMARK_AFFINE;
  };
  ...
  AnyFunTransform3DRBF RBFTransform =
  {
    ...
    Points0 = ..TSeg2ScaleFrame({...} * .AMirroring);
    Points1 = {...} * .AMirroring;
    ...
  };
};  // MyScalingFunction§_Mirrored§
After mirroring the landmarks, we have to think about the surfaces
which were also used in the construction of this transform. So we have
to reflect them too. This can be done easily by just changing the
ScaleXYZ members of the input surfaces of the AnyFunTransform3DSTL
class:
AnyFolder MyScalingFunction_Mirrored = {
  ...
  AnyFunTransform3DSTL STLTransform =
  {
    PreTransforms = {&.RBFTransform};
    PolynomDegree = 1;
    RBFDef.Type = RBF_Triharmonic;
    AnyFixedRefFrame Input = {
      AnySurfSTL SourceSurf = {
        FileName = "SourceFemur.stl";
        ScaleXYZ = {1, 1, -1};
        AnyFunTransform3D &pre = ....TSeg2ScaleFrame;
      };
      AnySurfSTL TargetSurf = {
        FileName = "TargetFemur.stl";
        ScaleXYZ = {1, 1, -1};
      };
    };
    ...
Finally, we have to include the mirrored scaling into the model exactly
the same way the left thigh scaling was included in the file CustomScaling.any:
Left.Thigh = {
  #include "MyScalingFunction.any"
  ScaleFunction.Custom = &MyScalingFunction.Transform;
};
 Right.Thigh = {
  #include "MyScalingFunction_Mirrored.any"
  ScaleFunction.Custom = &MyScalingFunction_Mirrored.Transform;
};
Now the right and left thigh are morphed using the custom scaling functions. When we load the model and look at our Model View, we can see that the model looks symmetric again and, compared to the standard scaling model, the bones look smaller. We can also see this in the following image where the model changed from the standard scaling case (left) to the custom scaling one (right):
This concludes the subject-specific scaling tutorial. A zip file containing the
modifications utilized for the mirrored transformed model can be downloaded
here.